
Thinking about starting an Etsy shop, selling your artwork or launching your own Shopify store? Here's why building an email list should be one of your very first steps, even if you haven't created a single product yet!
If you're dreaming of starting your own creative business, chances are you've already got a million ideas floating around in your head.
Maybe you're planning your first collection of digital products, designing beautiful stationery, creating illustrations or finally getting ready to open that Etsy or Shopify store you've been thinking about.
And while it's tempting to jump straight into creating products, designing your website and making everything look beautiful, there's something I really encourage you to think about from the very beginning.
Your email list!
Now, I know what you might be thinking.
"But Alicia, I haven't even got anything to sell yet!"
And that's completely fine, my friend!
Because here's something I've learnt from running my own creative businesses over the years: you don't need to have a finished product, a beautiful website or even an online shop to start building an audience.
In fact, starting your email list before you launch might just be one of the smartest things you can do for your future creative business.
And today, I'm going to show you exactly how I'm doing this for a brand new business of my own!
A little announcement: I'm starting a new creative business!
Before we get into the practical side of things, I have something exciting to share.
I'm starting a brand new creative business called Lici Loves Co.!
If you've been following my journey for a while, you'll know that I've spent years creating and selling digital products, mainly on Etsy, while teaching other creatives how to turn their ideas into products they can sell.
And I've absolutely loved it!
But lately, I've been feeling this little pull to get back to the creative side of things myself.
Drawing, designing, experimenting with different materials and simply making things because I enjoy making them.
Not everything we create needs to become a product, a tutorial or something we can sell. Sometimes it's just lovely to sit down, get creative and enjoy the process.
And that's really where the idea for Lici Loves Co. came from.
I'm creating a little stationery brand filled with illustrated sticker sheets, beautiful patterned papers, creative journalling supplies and coordinating journalling kits.
The idea is to encourage people to slow down, explore their creativity and enjoy making something completely their own.
And of course, there's a business adventure happening behind the scenes, too!
I'll be building my own Shopify store, creating the products myself and documenting the entire journey on YouTube.
The exciting part? I'm starting right at the beginning.
I don't have a shop full of products ready to sell. I'm still developing my ideas and working through what those first collections will look like.
But there's one thing I can start doing right now.
Building an audience of people who might love what I'm creating!
And that's exactly what we're going to talk about today.
Why every creative business needs an email list
One of the biggest lessons I've learnt from selling online is that you don't want to rely entirely on someone else's platform to connect with your customers.
Don't get me wrong, I love platforms like Etsy!
They're fantastic for helping people discover your products, particularly when you're just getting started.
And social media platforms like Instagram, Pinterest and YouTube can be wonderful ways to share your creative work and attract new people to your business.
But here's the thing.
Platforms change.
Algorithms change.
Rules and policies change.
And sometimes, as I'm discovering myself, your business changes too!
When you're relying entirely on Etsy or social media, you're also relying on those platforms to help you reach your audience.
But with an email list, you have a direct way to communicate with people who have chosen to hear from you.
You can share new product launches, behind-the-scenes updates, special offers, helpful resources and little glimpses into what you're creating.
And you're not relying on an algorithm to decide whether those people will see your latest update.
Of course, building an email list doesn't mean every email will be opened or that every subscriber will become a customer.
But it does give you another way to build genuine connections with people who are interested in your creative business.
And that's incredibly valuable!
You don't need products to start building your email list
This is probably the biggest thing I want you to take away from this article.
You can start building your email list before you've launched anything!
In fact, I think there's something really lovely about inviting people into your creative journey from the very beginning.
Instead of waiting until everything is finished and announcing, "Hey, my shop is open!", you can start sharing the process of bringing your ideas to life.
And depending on the type of creative business you're building, there are so many ways you could approach this.
If you're creating digital products
You could start sharing sneak peeks of the templates, planners, printables or digital resources you're working on.
Maybe you're creating a new collection of party printables or designing your very first digital journal.
You could invite people to join your email list to follow your progress and be the first to know when your products are available.
If you're an illustrator or artist
Why not create a little freebie using some of your artwork?
It could be a printable art print, a digital wallpaper, a colouring page or a mini collection of illustrated elements.
This gives people a lovely introduction to your creative style while helping you build an audience who appreciate your work.
If you're opening an Etsy or Shopify store
Consider creating a simple launch waitlist!
You could invite people to sign up for product updates, sneak peeks, launch announcements or perhaps a little subscriber-only surprise when your shop opens.
And that's exactly the approach I'm taking with Lici Loves Co.
I want to start connecting with people who love creative journalling, stickers, beautiful papers and all those lovely little stationery bits and pieces.
I can share what I'm creating, ask for feedback and invite them to follow along as the business comes together.
That way, when I'm finally ready to launch, I won't be starting completely from scratch when it comes to finding an audience.
The email marketing platform I've been using since 2019
Now, let's talk about how you can actually start collecting those email addresses.
For my own creative businesses, I use Flodesk.
And this isn't something I've only recently started using.
I've actually been using Flodesk since 2019, when the platform first launched!
Over the years, it's become such an important part of how I communicate with my audience, share new resources and promote my digital products.
And one of the biggest reasons I've continued using it is because I love how easy it is to create beautiful emails that feel like an extension of my brand.
If you're someone who loves playing around with colours, fonts, illustrations and beautiful layouts, you'll probably understand why that's important to me.
I don't want my emails to look like something from a boring corporate office!
I want them to feel creative, welcoming and personal.
And that's something I've always enjoyed about Flodesk.
You can create beautifully branded emails, design sign-up forms, organise your subscribers and set up automated workflows to welcome people to your business.
Another feature I really appreciate is Flodesk's unlimited email plans.
With these plans, you can have unlimited subscribers and send unlimited emails for a flat subscription price, rather than paying more simply because your list grows.
For context, my existing email list has grown to more than 10,000 active subscribers, so this is something I particularly appreciate!
And if you're just starting out, Flodesk also has a free option for creating forms and collecting subscribers before you're ready to begin sending marketing emails.
Want to give Flodesk a try?
You can get 25% off your first year using my Flodesk Partner link below.
Disclosure: I'm a Flodesk Partner, and this article contains an affiliate link. I may earn a commission if you sign up through my link, at no additional cost to you. I've personally used Flodesk since 2019, and all opinions shared are my own.
How to start building your email list with Flodesk
Now for the fun part!
I'm going to walk you through the same process I've been using to set up an email list for Lici Loves Co.
And remember, you don't need to have a finished website or online shop to follow along.
All we're going to do is set up our branding, create a sign-up form and prepare an automated welcome email.
That's it!
Step 1: Create your Flodesk account and set up your branding
Once you've created your Flodesk account, the first thing I recommend doing is setting up your brand details.
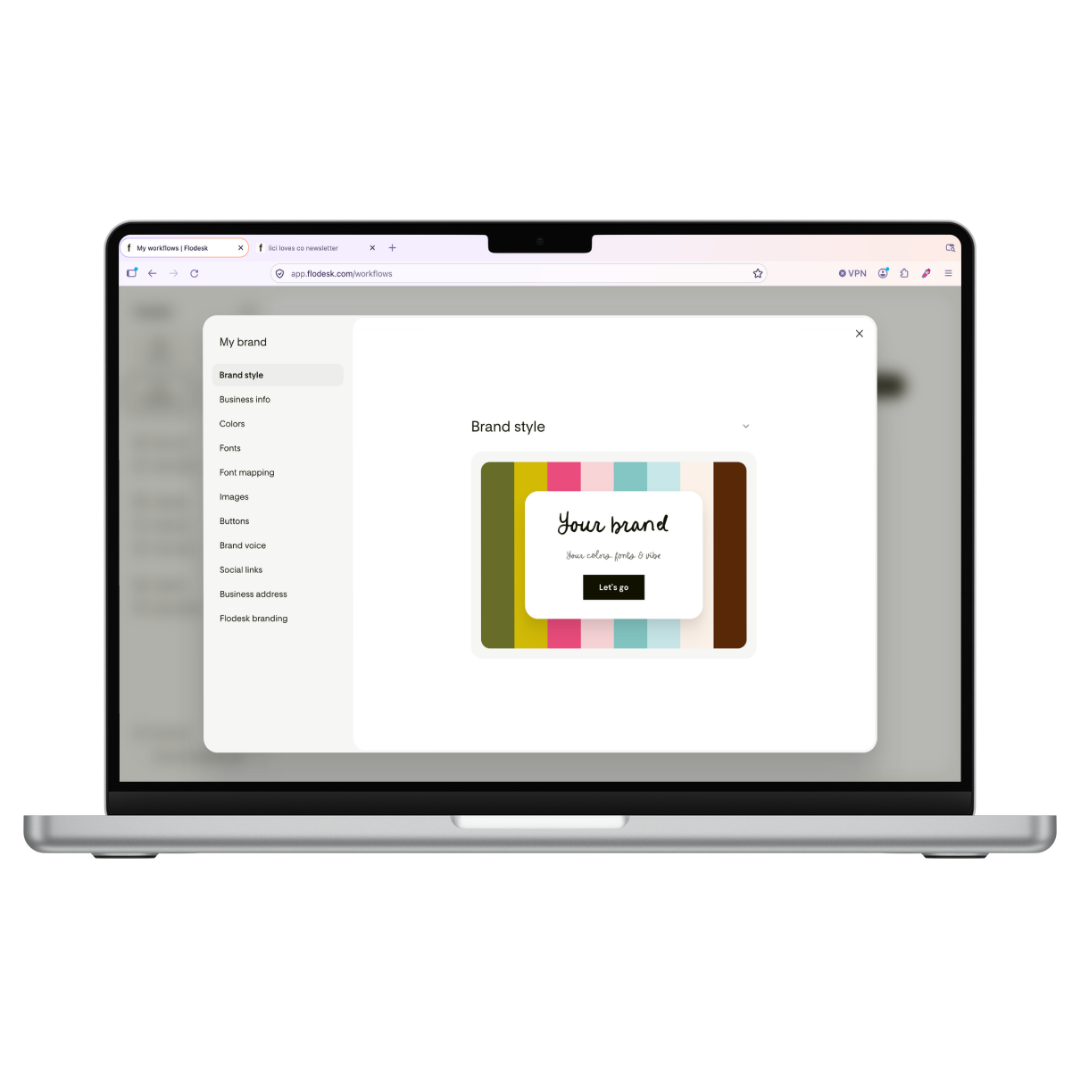
Inside Flodesk, you'll find a dedicated My Brand area where you can add your business information and customise your branding.
This includes things like:
Your business name and logo
Your brand colours
Your favourite fonts
Your business information
Your brand voice, if you'd like to use the AI features
For Lici Loves Co., I've started by uploading my logo, adding my colour palette and choosing fonts that match the look and feel I want for the business.
And don't worry if you haven't figured out your branding just yet!
You can always come back and update these details later.
The reason I recommend doing this first is that Flodesk can then use those brand settings when you're creating emails and sign-up forms.
It makes keeping everything consistent so much easier.
Step 2: Create your first email sign-up form
Next, we're going to create the form people will use to join your email list.
Inside Flodesk, head over to Forms and select the option to create a new form.
You'll find a collection of templates that you can customise to match your business.
Now, here's a little tip!
If you don't have a website yet, I recommend starting with a full-page form.
Why?
Because Flodesk gives you a shareable link to your form.
That means you can start collecting email subscribers without needing to embed anything on a website.
You could share that link in your Instagram bio, YouTube description, Pinterest content or anywhere else you're inviting people to follow your business journey.
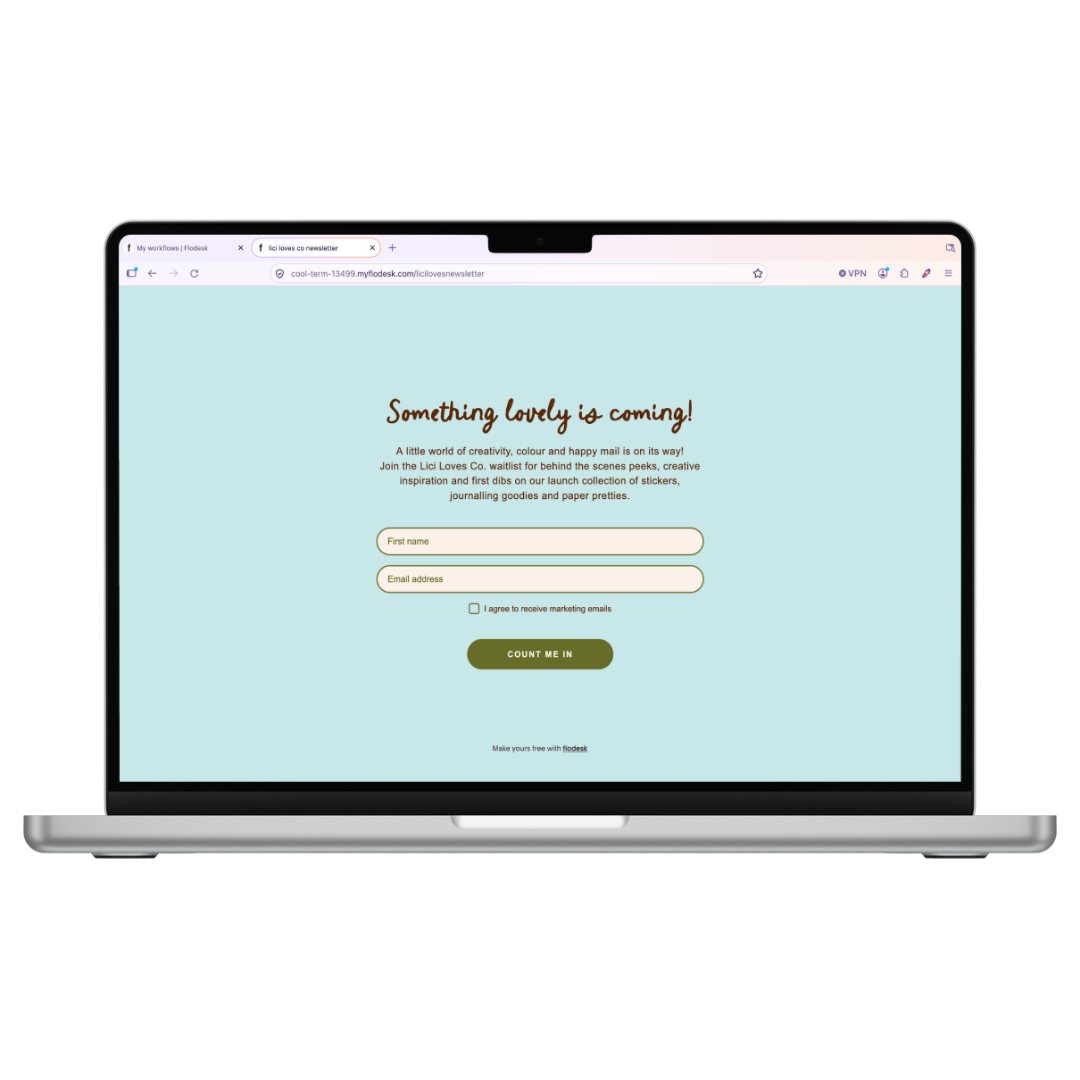
For Lici Loves Co., I'm creating a simple newsletter sign-up form inviting people to join the list and hear about what's happening behind the scenes.
Nothing complicated!
Just a friendly invitation to follow along as the business comes to life.
Step 3: Customise your form and connect your subscribers
Once you've chosen your form template, it's time to make it your own.
Start by updating the headline and description so people understand exactly what they're signing up for.
For example, rather than simply saying "Subscribe to my newsletter", you could say something like:
A Little Creativity Is Coming Your Way!
Join the Lici Loves Co. list for creative inspiration, behind-the-scenes updates, sneak peeks of new stationery collections and first access when the shop opens!
Then customise your fonts, colours and button text.
For my form, I've kept things simple with a first name field, an email address field and a button that says Count Me In!
You'll also want to connect your form to a subscriber segment.
Think of a segment as a way to organise your audience based on what they've signed up for.
For example, you might have one segment for your general newsletter, another for people interested in a particular product collection, and another for people who've joined a launch waitlist.
For Lici Loves Co., I've created a newsletter segment to keep things simple.
Before publishing, make sure you also review your form settings, privacy information and marketing consent options.
You want people to know what they're signing up for and to have the appropriate permission to email them.
Once you're happy, you can publish your form and grab your shareable link.
And just like that, you've got somewhere to start collecting subscribers!
Step 4: Create an automated welcome email
Now, here's something I really recommend doing once your sign-up form is ready.
Set up a welcome email!
Think about it.
Someone has just discovered your creative business, liked what they saw and decided to give you their email address.
That's a lovely opportunity to introduce yourself and make them feel welcome.
And rather than manually sending an email every time someone subscribes, you can automate the process using Flodesk's workflows.
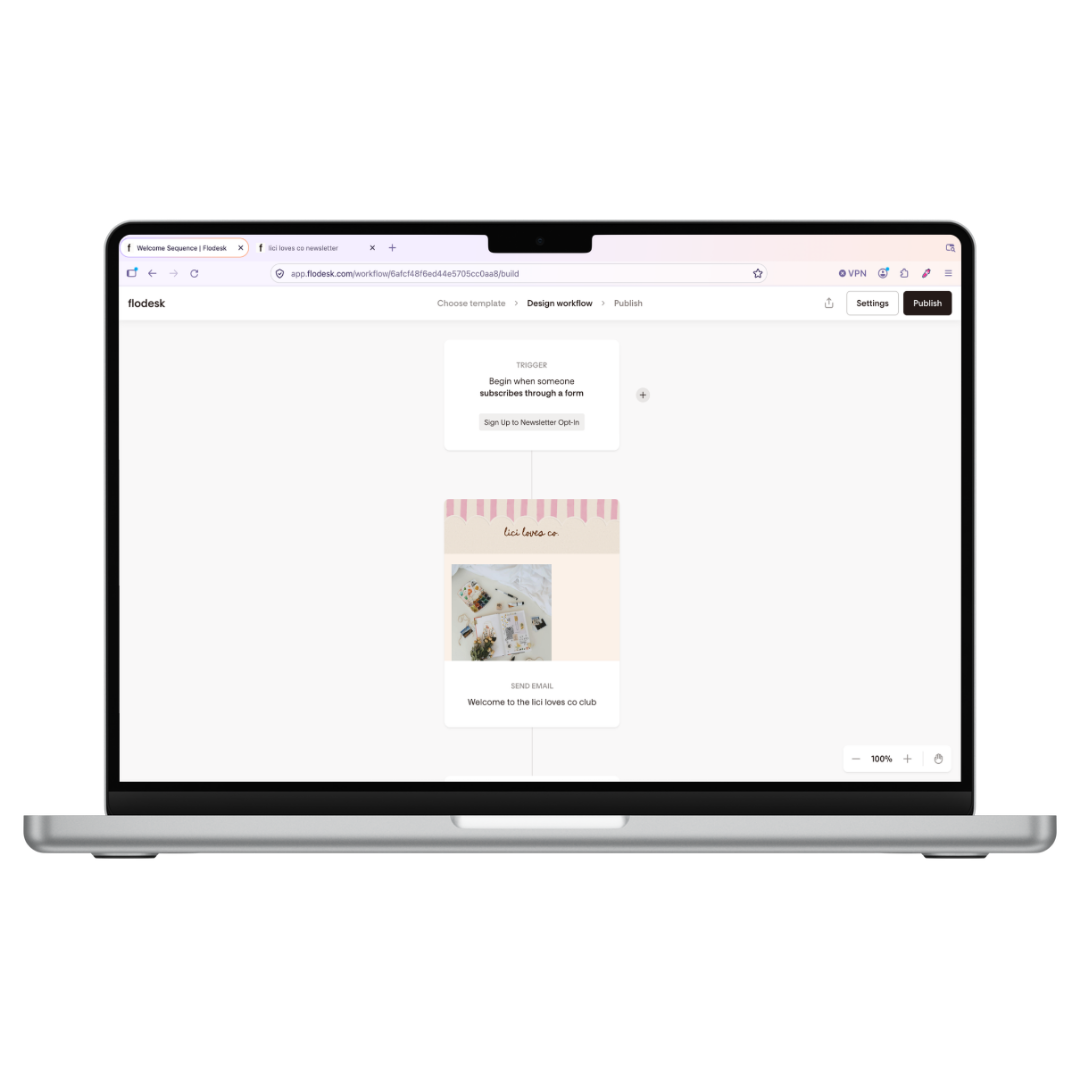
Inside Flodesk, head over to Workflows and create a new workflow.
You can start with a welcome sequence template, which is what I recommend if you're a beginner.
Then connect your workflow to the sign-up form you just created.
This means that when someone joins your list through that form, Flodesk can automatically send them your welcome email.
For Lici Loves Co., I'm creating a simple welcome email that introduces the brand, shares a little about what I'm working on and lets subscribers know what they can expect from me.
You could do something similar for your own business!
Step 5: Make your welcome email feel like your brand
This is one of my favourite parts of using Flodesk.
You can really have some fun with the design!
Choose an email template, add your logo, update the fonts and colours, and include images that reflect your creative style.
You can also personalise your emails by adding your subscriber's first name.
For example:
"Hi [First Name], welcome to my little creative corner of the internet!"
And if you're still working on your products, don't worry about having professional product photography ready.
You could share illustrations, work in progress photos, sketches or other little glimpses of your creative process.
The idea is simply to introduce your business and start building that connection.
One little tip I recommend is saving your finished email design as a favourite.
That way, you can reuse the layout for future emails without having to start from scratch every time.
Step 6: Publish your workflow and start sharing your form
Once you're happy with your welcome email, check your workflow settings and publish it.
Now your sign-up form and automated welcome email can work together.
Someone discovers your business, signs up through your form and receives a lovely welcome email introducing them to your creative world.
And you don't need to manually send a thing!
I'd also recommend testing the entire process yourself before sharing the link publicly.
Sign up using a test email address, check that everything works as expected and make sure your welcome email looks lovely on both desktop and mobile.
Then you're ready to start sharing your form and inviting people to join your list!
Watch the full Flodesk tutorial
Want to see exactly how I set everything up?
I've recorded a YouTube tutorial walking you through the process inside Flodesk's updated dashboard, including setting up your branding, creating your first opt-in form and building an automated welcome email.
You'll also get a little behind-the-scenes look at the beginning of my new creative business, Lici Loves Co.!
What should you email your subscribers before launching?
Now, you might be wondering what you're actually supposed to send people when you don't have anything to sell yet.
And this is where I think you can have a lot of fun!
Your email list doesn't need to be all about selling.
Especially in the beginning.
Instead, think about inviting people into your creative world.
You could share:
Behind the scenes updates: Show what you're designing, drawing or experimenting with.
Sneak peeks: Give subscribers an early look at new products or collections.
Creative inspiration: Share ideas, tutorials or helpful resources related to your niche.
Your story: Let people get to know the person behind the business and why you're creating what you're creating.
Questions and feedback: Ask subscribers what they'd love to see in your future collections.
Launch updates: Let your audience know when your shop is getting closer to opening.
For Lici Loves Co., I'm hoping to share a mixture of creative inspiration, little updates from my workspace and behind-the-scenes glimpses of the products I'm developing.
Nothing overly complicated.
Just genuine updates about something I'm excited to create!
And when the shop is eventually ready to open, I'll already have a way to let interested people know.
Your creative business doesn't need to be perfect to get started
If there's one thing I hope you take away from this article, it's that you don't need to have everything figured out before you start building your creative business.
You don't need hundreds of products.
You don't need a perfectly polished website.
And you certainly don't need thousands of followers!
Sometimes, it's just about taking that very first step.
For me, that's creating an email list for Lici Loves Co. while I'm still developing the products and working towards launching my Shopify store.
For you, it might be creating your first freebie, sharing your artwork online or inviting people to join a little launch waitlist.
Whatever you're working on, remember that building a creative business is a journey.
And you can start inviting people along for the ride before you've reached the finish line.
If you're ready to start building your own email list, you can check out Flodesk using my partner link below.
And if you'd love to follow along as I build Lici Loves Co. from the ground up, make sure you subscribe to my YouTube channel.
I'll be sharing everything from creating the products and experimenting with materials to setting up my Shopify store and hopefully celebrating those very first cha-chings!
Here's to turning our creative ideas into something wonderful.
